(http://www.digimoon.net/)
실습 환경 : Windows 7 32bit / VMWare Workstation 7.1.1 / RedHat Enterprise Linux 5.5 64bit
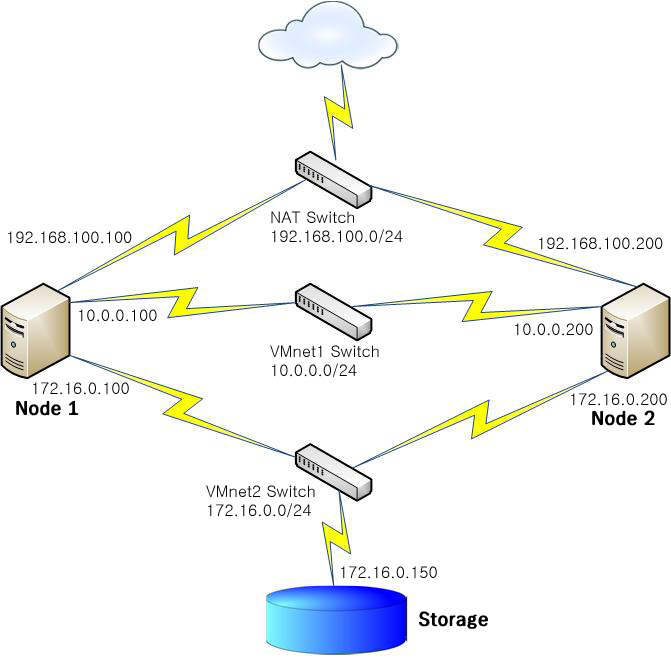
NAT 스위치의 192.168.100.0/24 네트워크를 통해 외부망 연결(yum update, 기타 용도)
VMnet1 스위치의 10.0.0.0/24 네트워크를 Heartbeat 구간으로 설정
VMnet2 스위치의 172.16.0.0/24 네트워크를 iSCSI 구간으로 설정
node1, node2, storage 호스트명 부여
VMnet1 스위치의 10.0.0.0/24 네트워크를 Heartbeat 구간으로 설정
VMnet2 스위치의 172.16.0.0/24 네트워크를 iSCSI 구간으로 설정
node1, node2, storage 호스트명 부여
1. 네트워크 구성
Node1, Node2, Storage별 네트워크 구성
▼ Node1
(붉은색으로 표기한 route-eth0 파일은 RHEL에서 정적 라우팅 구성을 위해 설정하는 파일이다. 이 설정을 제대로 해두지 않으면 외부 네트워크망과 통신이 불가능한 상황이 발생할 수 있다. 이더넷 인터페이스 중 하나를 외부망 통신용으로 사용하기 위한 설정이 필요하다. 여기선 eth0으로 지정했다.)
참고링크 :
http://docs.redhat.com/docs/en-US/Red_Hat_Enterprise_Linux/6/html/Deployment_Guide/s1-networkscripts-static-routes.html
[root@node1 ~]# cat /etc/sysconfig/network | grep HOSTNAME
HOSTNAME=node1
[root@node1 ~]# cat /etc/hosts
# Do not remove the following line, or various programs
# that require network functionality will fail.
127.0.0.1 localhost.localdomain localhost
10.0.0.100 node1
10.0.0.200 node2
[root@node1 ~]# cat /etc/sysconfig/network-scripts/ifcfg-eth0
DEVICE=eth0
BOOTPROTO=static
ONBOOT=yes
IPADDR=192.168.100.100
GATEWAY=192.168.100.2
NETMASK=255.255.255.0
[root@node1 ~]# cat /etc/sysconfig/network-scripts/ifcfg-eth1
DEVICE=eth1
BOOTPROTO=static
ONBOOT=yes
IPADDR=10.0.0.100
NETMASK=255.255.255.0
[root@node1 ~]# cat /etc/sysconfig/network-scripts/ifcfg-eth2
DEVICE=eth2
BOOTPROTO=static
ONBOOT=yes
IPADDR=172.16.0.100
NETMASK=255.255.255.0
[root@node1 ~]# cat /etc/sysconfig/network-scripts/route-eth0
ADDRESS0=192.168.100.0
GATEWAY0=192.168.100.2
NETMASK0=255.255.255.0
[root@node1 ~]#
▼ Node2
[root@node2 ~]# cat /etc/sysconfig/network | grep HOSTNAME
HOSTNAME=node2
[root@node2 ~]# cat /etc/hosts
# Do not remove the following line, or various programs
# that require network functionality will fail.
127.0.0.1 localhost.localdomain localhost
10.0.0.100 node1
10.0.0.200 node2
[root@node2 ~]# cat /etc/sysconfig/network-scripts/ifcfg-eth0
DEVICE=eth0
BOOTPROTO=static
ONBOOT=yes
IPADDR=192.168.100.200
GATEWAY=192.168.100.2
NETMASK=255.255.255.0
[root@node2 ~]# cat /etc/sysconfig/network-scripts/ifcfg-eth1
DEVICE=eth1
BOOTPROTO=static
ONBOOT=yes
IPADDR=10.0.0.200
NETMASK=255.255.255.0
[root@node2 ~]# cat /etc/sysconfig/network-scripts/ifcfg-eth2
DEVICE=eth2
BOOTPROTO=static
ONBOOT=yes
IPADDR=172.16.0.200
NETMASK=255.255.255.0
[root@node2 ~]# cat /etc/sysconfig/network-scripts/route-eth0
ADDRESS0=192.168.100.0
GATEWAY0=192.168.100.2
NETMASK0=255.255.255.0
[root@node2 ~]#
▼ Storage
(편의를 위해 상단 Lab 이미지에는 구성되어 있지 않으나 외부 네트워크 연결용 NAT 인터페이스 할당)
[root@storage ~]# cat /etc/sysconfig/network | grep HOSTNAME
HOSTNAME=storage
[root@storage ~]# cat /etc/hosts
# Do not remove the following line, or various programs
# that require network functionality will fail.
127.0.0.1 localhost.localdomain localhost
172.16.0.100 node1
172.16.0.200 node2
[root@storage ~]# cat /etc/sysconfig/network-scripts/ifcfg-eth0
DEVICE=eth0
BOOTPROTO=static
ONBOOT=yes
IPADDR=192.168.100.150
GATEWAY=192.168.100.2
NETMASK=255.255.255.0
[root@storage ~]# cat /etc/sysconfig/network-scripts/ifcfg-eth1
DEVICE=eth1
BOOTPROTO=static
ONBOOT=yes
IPADDR=172.16.0.150
NETMASK=255.255.255.0
[root@storage ~]# cat /etc/sysconfig/network-scripts/route-eth0
ADDRESS0=192.168.100.0
GATEWAY0=192.168.100.2
NETMASK0=255.255.255.0
[root@storage ~]#
2. iSCSI 구성
iSCSI 및 RHCS 세팅을 위해 각 노드와 스토리지에 모두 Clustering, Cluster Storage 패키지그룹 설치
[root@storage ~]# yum -y groupinstall "Clustering" "Cluster Storage"
① Storage 설정
scsi-target-utils 패키지(리눅스 박스를 iSCSI 스토리지처럼 탈바꿈시켜주는 역할의 패키지) 설치 유무 확인
[root@storage ~]# rpm -qa | grep scsi-target-utils
scsi-target-utils-0.0-5.20080917snap.el5
[root@storage ~]#
scsi-target-utils-0.0-5.20080917snap.el5
[root@storage ~]#
scsi-target-utils 패키지의 tgtd 서비스 데몬 구동
[root@storage ~]# /etc/init.d/tgtd start
시스템 시작 시 tgtd 서비스 자동으로 올라오도록 chkconfig 등록
[root@storage ~]# chkconfig --level 345 tgtd on
Clustering 패키지그룹을 설치하면 scsi-target-utils 뿐만 아니라 iscsi-initiator-utils도 설치되는데 scsi-target-utils을 세팅하는 스토리지에서는 필요치 않으므로 chkconfig 비활성화(노드 쪽에는 반대의 구성이 된다)
[root@storage ~]# chkconfig --level 345 iscsid off
[root@storage ~]# chkconfig --level 345 iscsi off
[root@storage ~]# chkconfig --level 345 iscsi off
Node1, Node2에 제공할 블록 디바이스 추가(/dev/sda, /dev/sdb)하고 파티셔닝
[root@storage ~]# fdisk -l
Disk /dev/hda: 10.7 GB, 10737418240 bytes
255 heads, 63 sectors/track, 1305 cylinders
Units = cylinders of 16065 * 512 = 8225280 bytes
Disk /dev/hda: 10.7 GB, 10737418240 bytes
255 heads, 63 sectors/track, 1305 cylinders
Units = cylinders of 16065 * 512 = 8225280 bytes
Device Boot Start End Blocks Id System
/dev/hda1 * 1 13 104391 83 Linux
/dev/hda2 14 274 2096482+ 82 Linux swap / Solaris
/dev/hda3 275 859 4699012+ 83 Linux
/dev/hda4 860 1305 3582495 5 Extended
/dev/hda5 860 1241 3068383+ 83 Linux
/dev/hda6 1242 1305 514048+ 83 Linux
/dev/hda1 * 1 13 104391 83 Linux
/dev/hda2 14 274 2096482+ 82 Linux swap / Solaris
/dev/hda3 275 859 4699012+ 83 Linux
/dev/hda4 860 1305 3582495 5 Extended
/dev/hda5 860 1241 3068383+ 83 Linux
/dev/hda6 1242 1305 514048+ 83 Linux
Disk /dev/hdb: 10.7 GB, 10737418240 bytes
15 heads, 63 sectors/track, 22192 cylinders
Units = cylinders of 945 * 512 = 483840 bytes
15 heads, 63 sectors/track, 22192 cylinders
Units = cylinders of 945 * 512 = 483840 bytes
Device Boot Start End Blocks Id System
/dev/hdb1 1 22192 10485688+ 83 Linux
/dev/hdb1 1 22192 10485688+ 83 Linux
Disk /dev/hdd: 1073 MB, 1073741824 bytes
16 heads, 63 sectors/track, 2080 cylinders
Units = cylinders of 1008 * 512 = 516096 bytes
16 heads, 63 sectors/track, 2080 cylinders
Units = cylinders of 1008 * 512 = 516096 bytes
Device Boot Start End Blocks Id System
/dev/hdd1 1 2080 1048288+ 83 Linux
/dev/hdd1 1 2080 1048288+ 83 Linux
Disk /dev/sda: 1073 MB, 1073741824 bytes
255 heads, 63 sectors/track, 130 cylinders
Units = cylinders of 16065 * 512 = 8225280 bytes
255 heads, 63 sectors/track, 130 cylinders
Units = cylinders of 16065 * 512 = 8225280 bytes
Device Boot Start End Blocks Id System
/dev/sda1 1 130 1044193+ 83 Linux
/dev/sda1 1 130 1044193+ 83 Linux
Disk /dev/sdb: 1073 MB, 1073741824 bytes
255 heads, 63 sectors/track, 130 cylinders
Units = cylinders of 16065 * 512 = 8225280 bytes
255 heads, 63 sectors/track, 130 cylinders
Units = cylinders of 16065 * 512 = 8225280 bytes
Device Boot Start End Blocks Id System
/dev/sdb1 1 130 1044193+ 83 Linux
[root@storage ~]#
/dev/sdb1 1 130 1044193+ 83 Linux
[root@storage ~]#
방화벽을 사용하는 경우 아래 룰 적용(tcp 3260 open)
[root@storage ~]# iptables -A RH-Firewall-1-INPUT -m state --state NEW -m tcp -p tcp --dport 3260 -m comment --comment "iscsi-target" -j ACCEPT
iSCSI target device를 설정하고 각 타겟별 logical unit 설정(붉게 하이라이트한 부분은 임의로 지정 가능하다.)
[root@storage ~]# /usr/sbin/tgtadm --lld iscsi --op new --mode target --tid 1 -T iqn.storage:iscsi-storage
[root@storage ~]# /usr/sbin/tgtadm --lld iscsi --op new --mode logicalunit --tid=1 --lun=1 -b /dev/sda1
[root@storage ~]# /usr/sbin/tgtadm --lld iscsi --op new --mode logicalunit --tid=1 --lun=2 -b /dev/sdb1
[root@storage ~]# /usr/sbin/tgtadm --lld iscsi --op bind --mode target --tid 1 -I 172.16.0.100
[root@storage ~]# /usr/sbin/tgtadm --lld iscsi --op bind --mode target --tid 1 ?I 172.16.0.200
※ 각 노드로 타겟 설정을 할 때 노드의 호스트명이 아닌 IP로 해 주는 것에 유의한다.[root@storage ~]# /usr/sbin/tgtadm --lld iscsi --op new --mode logicalunit --tid=1 --lun=1 -b /dev/sda1
[root@storage ~]# /usr/sbin/tgtadm --lld iscsi --op new --mode logicalunit --tid=1 --lun=2 -b /dev/sdb1
[root@storage ~]# /usr/sbin/tgtadm --lld iscsi --op bind --mode target --tid 1 -I 172.16.0.100
[root@storage ~]# /usr/sbin/tgtadm --lld iscsi --op bind --mode target --tid 1 ?I 172.16.0.200
아래처럼 각 노드별로 타겟 설정을 일일이 해주지 않고…
[root@storage ~]# /usr/sbin/tgtadm --lld iscsi --op bind --mode target --tid 1 -I 172.16.0.100
[root@storage ~]# /usr/sbin/tgtadm --lld iscsi --op bind --mode target --tid 1 -I 172.16.0.200
[root@storage ~]# /usr/sbin/tgtadm --lld iscsi --op bind --mode target --tid 1 -I 172.16.0.200
아래 한 줄로 대신해도 된다.
[root@storage ~]# /usr/sbin/tgtadm --lld iscsi --op bind --mode target --tid 1 -I ALL
tgtd 서비스는 리스타트하면 설정이 다 날아간다. 그러므로 타겟 정보를 변경해야 하거나 리부팅이 필요한 경우 주의를 요한다.
시스템을 리부팅해도 타겟 설정을 계속 활용하려면 /etc/rc.d/rc.local 파일에 타겟 설정 커맨드를 등록해 주어야 한다.
[root@storage ~]# cat /etc/rc.d/rc.local | grep -v "^#"
touch /var/lock/subsys/local
/usr/sbin/tgtadm --lld iscsi --op new --mode target --tid 1 -T iqn.storage:iscsi-storage
/usr/sbin/tgtadm --lld iscsi --op new --mode logicalunit --tid=1 --lun=1 -b /dev/sda1
/usr/sbin/tgtadm --lld iscsi --op new --mode logicalunit --tid=1 --lun=2 -b /dev/sdb1
/usr/sbin/tgtadm --lld iscsi --op bind --mode target --tid 1 -I 172.16.0.100
/usr/sbin/tgtadm --lld iscsi --op bind --mode target --tid 1 -I 172.16.0.200
[root@storage ~]#
LUN: 0은 iSCSI 컨트롤러, LUN: 1, LUN: 2는 블록 디바이스이다.
[root@storage ~]# /usr/sbin/tgtadm --lld iscsi --op show --mode target
Target 1: iqn.storage:iscsi-storage
System information:
Driver: iscsi
State: ready
I_T nexus information:
LUN information:
LUN: 0
Type: controller
SCSI ID: deadbeaf1:0
SCSI SN: beaf10
Size: 0 MB
Online: Yes
Removable media: No
Backing store: No backing store
LUN: 1
Type: disk
SCSI ID: deadbeaf1:1
SCSI SN: beaf11
Size: 1069 MB
Online: Yes
Removable media: No
Backing store: /dev/sda1
LUN: 2
Type: disk
SCSI ID: deadbeaf1:2
SCSI SN: beaf12
Size: 1069 MB
Online: Yes
Removable media: No
Backing store: /dev/sdb1
Account information:
ACL information:
172.16.0.100
172.16.0.200
[root@storage ~]#
② 노드 설정
iscsi-initiator-utils 패키지 설치 유무 확인
[root@node1 ~]# rpm -qa | grep iscsi-initiator-utils
iscsi-initiator-utils-6.2.0.871-0.16.el5
[root@node1 ~]#
iscsi-initiator-utils-6.2.0.871-0.16.el5
[root@node1 ~]#
scsi-target-utils 패키지와 연관된 서비스 데몬은 모두 비활성화(storage와는 반대 구성)
[root@node1 ~]# /etc/init.d/tgtd status
tgtd is stopped
[root@node1 ~]# chkconfig --level 345 tgtd off
tgtd is stopped
[root@node1 ~]# chkconfig --level 345 tgtd off
iscsi 서비스 구동
[root@storage ~]# /etc/init.d/iscsi start
스토리지에 세팅해 둔 iSCSI target 영역과의 연결 시도
[root@node1 ~]# /sbin/iscsiadm -m discovery -t sendtargets -p 172.16.0.150
172.16.0.150:3260,1 iqn.storage:iscsi-storage
[root@node1 ~]# /sbin/iscsiadm -m node --loginall=automatic
Logging in to [iface: default, target: iqn.storage:iscsi-storage, portal: 172.16.0.150,3260]
Login to [iface: default, target: iqn.storage:iscsi-storage, portal: 172.16.0.150,3260]: successful
[root@node1 ~]#
fdisk로 확인해 보면 스토리지의 공유 블록 디바이스 영역이 연결된 것을 알 수 있다.
[root@node1 ~]# fdisk -l
Disk /dev/hda: 10.7 GB, 10737418240 bytes
255 heads, 63 sectors/track, 1305 cylinders
Units = cylinders of 16065 * 512 = 8225280 bytes
255 heads, 63 sectors/track, 1305 cylinders
Units = cylinders of 16065 * 512 = 8225280 bytes
Device Boot Start End Blocks Id System
/dev/hda1 * 1 13 104391 83 Linux
/dev/hda2 14 274 2096482+ 82 Linux swap / Solaris
/dev/hda3 275 859 4699012+ 83 Linux
/dev/hda4 860 1305 3582495 5 Extended
/dev/hda5 860 1241 3068383+ 83 Linux
/dev/hda6 1242 1305 514048+ 83 Linux
/dev/hda1 * 1 13 104391 83 Linux
/dev/hda2 14 274 2096482+ 82 Linux swap / Solaris
/dev/hda3 275 859 4699012+ 83 Linux
/dev/hda4 860 1305 3582495 5 Extended
/dev/hda5 860 1241 3068383+ 83 Linux
/dev/hda6 1242 1305 514048+ 83 Linux
Disk /dev/hdb: 10.7 GB, 10737418240 bytes
15 heads, 63 sectors/track, 22192 cylinders
Units = cylinders of 945 * 512 = 483840 bytes
15 heads, 63 sectors/track, 22192 cylinders
Units = cylinders of 945 * 512 = 483840 bytes
Device Boot Start End Blocks Id System
/dev/hdb1 1 22192 10485688+ 83 Linux
/dev/hdb1 1 22192 10485688+ 83 Linux
Disk /dev/hdd: 1073 MB, 1073741824 bytes
16 heads, 63 sectors/track, 2080 cylinders
Units = cylinders of 1008 * 512 = 516096 bytes
16 heads, 63 sectors/track, 2080 cylinders
Units = cylinders of 1008 * 512 = 516096 bytes
Device Boot Start End Blocks Id System
/dev/hdd1 1 2080 1048288+ 83 Linux
/dev/hdd1 1 2080 1048288+ 83 Linux
Disk /dev/sda: 1069 MB, 1069254144 bytes
33 heads, 62 sectors/track, 1020 cylinders
Units = cylinders of 2046 * 512 = 1047552 bytes
33 heads, 62 sectors/track, 1020 cylinders
Units = cylinders of 2046 * 512 = 1047552 bytes
Disk /dev/sda doesn't contain a valid partition table
Disk /dev/sdb: 1069 MB, 1069254144 bytes
33 heads, 62 sectors/track, 1020 cylinders
Units = cylinders of 2046 * 512 = 1047552 bytes
33 heads, 62 sectors/track, 1020 cylinders
Units = cylinders of 2046 * 512 = 1047552 bytes
Disk /dev/sdb doesn't contain a valid partition table
[root@node1 ~]#
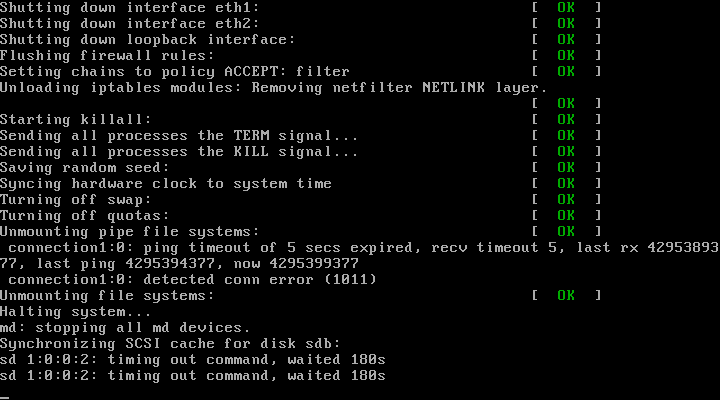
이제부터 스토리지의 iSCSI 타겟 영역과의 연결은 /etc/rc.d/init.d/iscsi 스크립트로 손쉽게 관리한다.※ RHEL 5.5를 사용하는 경우 iscsi-initiator 세션이 남아 있는 상태에서 시스템을 셧다운하면 /etc/init.d/network 스크립트 쪽 문제로 딜레이가 오래 걸리는 버그가 있다. /etc/init.d/network 스크립트를 수정해 주어야 한다. 아래 링크 참고한다. iscsi 세션이 남아 있는 경우 network 데몬 stop 과정을 skip 시키는 내용이다.
https://bugzilla.redhat.com/show_bug.cgi?id=583218
아래 내용을 파일로 저장하고(예: patch.txt)
200,201c200,201
< # If this is a final shutdown/halt and there is an iSCSI session,
< # do not stop the service.
---
> # If this is a final shutdown/halt and there is an iSCSI session,
> # do not stop the service.
203c203
< if [ `find /sys/class/iscsi_session/ -mindepth 1 -maxdepth 1 -type d | wc -l` -ge 1 ]; then
---
> if [ -d /sys/class/iscsi_session/session* ]; then
207c207
<
---
>
/etc/rc.d/init.d/network 파일에 패치해 준다(node 쪽에만 패치해 주면 된다).
[root@node1 ~]# patch -p0 /etc/rc.d/init.d/network < patch.txt

