(http://www.digimoon.net/)
파일 송수신 프로토콜로 FTP가 널리 사용되고 있습니다.
그러나 이 FTP는 사실 보안에 매우 취약합니다. 별다른 보안 대책을 세우지 않고 vsftpd나 proftpd로 FTP 서버를 구축하면 FTP 계정으로 로그인 시 ID와 패스워드는 평문으로 고스란히 전송되기 때문이죠. 악의적인 목적을 가진 이가 패킷 스니핑을 시도하여 성공하면 당신의 ID와 패스워드는 토씨 하나 틀리지 않고 그대로 탈취당하게 됩니다.
이러한 FTP의 약점을 극복하기 위해 SFTP, FTPS와 같은 대안이 마련되어 나왔습니다. 서버에서 SSH를 서비스하고 있고 클라이언트에서 SFTP 접속을 지원한다면 서버 쪽에서는 별다른 추가 설정 없이 SFTP 서비스를 수행할 수 있다는 장점이 있으나 SSH에 chroot를 구현해 놓지 않았다면 일반 계정 사용자가 계정에 로그인 후 SFTP 상으로 상위 디렉토리 경로로 마음껏 이동할 수 있다는 보안상 헛점이 노출됩니다.
chroot를 적용한다면 문제될 게 없겠지만 사실 SFTP를 허용한다는 건 SSH 역시 허용한다는 것이고 이는 사용자에게 쉘을 허용한다는 것과 마찬가지이므로 보안에 더욱 유의할 필요가 있습니다. 또한 대두되는 약점으로 SFTP는 후에 설명하게 될 FTPS에 비해 파일 송수신 시 속도가 FTP, FTPS에 비해 떨어진다는 평이 많다는 겁니다. 아무래도 100% 패킷이 암호화되어 전송되는 형태이니 서버의 CPU가 뒷받침되지 못한다면 성능은 더더욱 떨어지게 마련입니다.
그래서 이번 장에서는 vsftpd를 이용하여 SFTP와 비교하여 보안상 손색이 없으며 중저급 사양 서버에서도 보안과 속도 두 마리 토끼를 거머쥘 수 있는 FTPS(FTP over SSL/TLS)를 구현하는 방법에 대해 소개합니다.
우선 자신의 서버에 설치되어 있는 vsftpd가 ssl/tls를 지원하는지의 여부를 먼저 파악해야 합니다.
CentOS 5.2 32bit의 경우 vsftpd 2.0.5가 기본으로 설치되어 있습니다. ssl/tls를 지원하는지 확인하려면 아래와 같이 입력합니다.
아래와 같은 행이 보이면 지원하는 겁니다.
이제 SSL 통신을 위한 인증서를 생성해야 합니다.
CentOS 5.2 32bit 기준으로 설명합니다. /etc/pki/tls/certs 디렉토리로 이동하여 아래와 같이 작업합니다.
다이얼로그 방식으로 이것저것 묻습니다. 붉은색으로 표시한 부분처럼 알맞게 기입해 주면 됩니다.
[root@ns certs]# make vsftpd.pem
umask 77 ; \
PEM1=`/bin/mktemp /tmp/openssl.XXXXXX` ; \
PEM2=`/bin/mktemp /tmp/openssl.XXXXXX` ; \
/usr/bin/openssl req -newkey rsa:1024 -keyout $PEM1 -nodes -x509 -days 365 -out $PEM2 -set_serial 0 ; \
cat $PEM1 > vsftpd.pem ; \
echo "" >> vsftpd.pem ; \
cat $PEM2 >> vsftpd.pem ; \
rm -f $PEM1 $PEM2
Generating a 1024 bit RSA private key
...................++++++
........++++++
writing new private key to '/tmp/openssl.y26449'
-----
You are about to be asked to enter information that will be incorporated
into your certificate request.
What you are about to enter is what is called a Distinguished Name or a DN.
There are quite a few fields but you can leave some blank
For some fields there will be a default value,
If you enter '.', the field will be left blank.
-----
Country Name (2 letter code) [GB]:KR
State or Province Name (full name) [Berkshire]:Gyeonggi-do
Locality Name (eg, city) [Newbury]:Seongnam-si
Organization Name (eg, company) [My Company Ltd]:Digimoon
Organizational Unit Name (eg, section) []:
Common Name (eg, your name or your server's hostname) []:digimoon.net
Email Address []:admin@digimoon.net
[root@ns certs]# ll
합계 476
drwxr-xr-x 2 root root 4096 11월 14 16:57 .
drwxr-xr-x 5 root root 4096 11월 14 16:56 ..
-rw-r--r-- 1 root root 2240 6월 15 08:37 Makefile
-rw-r--r-- 1 root root 441017 6월 15 08:37 ca-bundle.crt
-rw------- 1 root root 1269 11월 6 15:14 ca.crt
-rw-r----- 1 root mail 2352 5월 1 2008 cyrus-imapd.pem
-rw------- 1 exim exim 1387 5월 1 2008 exim.pem
-rwxr-xr-x 1 root root 610 6월 15 08:37 make-dummy-cert
-rw------- 1 root root 2133 11월 14 16:57 vsftpd.pem
[root@ns certs]#
이렇게 CentOS 5.2에서는 /etc/pki/tls/certs/make 스크립트로 간단하게 pem 파일을 생성할 수 있습니다. Makefile 파일을 편집기로 열어보면 이해가 갈 것입니다.
같은 방법으로 key나 csr 파일도 생성할 수 있습니다. 대신 이렇게 생성하면 1년짜리 사설 인증서가 만들어지므로 좀 더 기간이 넉넉한 10년 이상짜리 인증서를 만들고 싶으면 openssl 커맨드로 직접 생성하면 됩니다.
10년짜리 인증서를 만들어 보았습니다.
인증서에 오로지 root 권한으로만 읽기, 쓰기가 가능하도록 퍼미션을 부여합니다.
아래 커맨드로 디지털 인증을 위해 다이얼로그 방식으로 기입해 넣었던 개인, 지역 정보 등을 확인할 수 있습니다.
이렇게 만든 인증서를 적당한 디렉토리 경로에 두고 뒤에 설명할 vsftpd.conf 파일 수정 시 경로를 적절히 지정해 주면 됩니다.
ftps를 구현하기 위해 vsftpd.conf 파일에 적용하는 내용은 간단합니다.
vsftpd.conf 에 아래 내용만 추가해주면 끝납니다.
FTP서버를 Active Mode로 구동하며 기본 포트로 데이터/세션 채널을 20/21번으로 사용하고 있다는 전제하입니다.
rsa_cert_file=/etc/pki/tls/certs/vsftpd.pem
force_local_logins_ssl=YES
force_local_data_ssl=NO
# listen_port=21 <- 기본 포트 21번을 사용한다면 굳이 명시하지 않아도 됨. 여기서는 주석처리
ssl_tlsv1=YES
ssl_sslv2=NO
ssl_sslv3=NO
allow_anon_ssl=NO
ftp_data_port=20
Passive Mode로 운영한다면 아래와 같이 설정합니다.
패시브 모드용 포트를 TCP 50000~50005로 사용한다는 전제하입니다. 패시브 모드로 설정하면 데이터 채널은 pasv_min_port와 pasv_max_port 옵션에 지정해 둔 포트 영역만을 사용하게 되므로 ftp_data_port 옵션으로 데이터 채널 사용 포트를 별도로 명시해 줄 필요가 없습니다. 그래서 아래 설정 내용엔 없죠.
rsa_cert_file=/etc/pki/tls/certs/vsftpd.pem
force_local_logins_ssl=YES
force_local_data_ssl=NO
ssl_tlsv1=YES
ssl_sslv2=NO
ssl_sslv3=NO
allow_anon_ssl=NO
pasv_enable=YES
pasv_min_port=50000
pasv_max_port=50005
vsftpd.conf 파일을 수정하였으면 vsftpd 데몬을 재시작하고 이제 FTP 클라이언트 프로그램으로 접속 테스트해 봅니다.
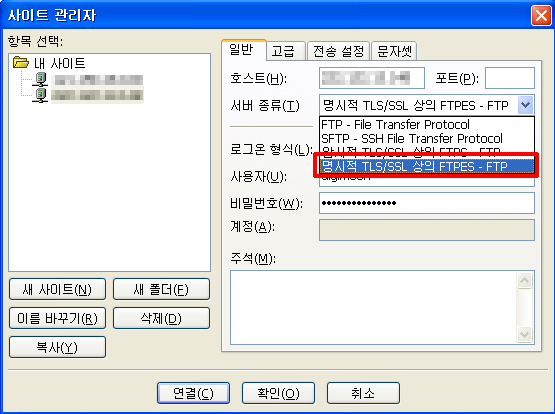
널리 사용되는 알FTP의 경우 08년 11월 4일 현재 최신 버전으로는 ftps 접속 방식을 지원하지 않고 있습니다. sftp는 지원하는군요. 그래서 알FTP를 주로 사용한다면 알FTP를 버려야 합니다.
개인적으로 Filezilla를 추천합니다. 참고로 파일질라는 기본값으로 패시브모드 접속을 시도합니다.
08년 11월 파일질라는 3.1.5 버전이 최신이로군요. 이걸 설치하고 아래와 같이 설정하고 접속 시도합니다.
아래와 같은 에러를 만나며 접속이 되지 않는 경우가 있습니다.
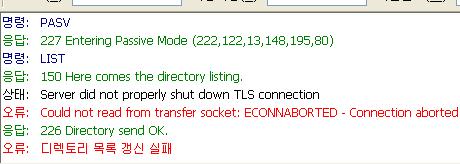
원인은 아래 링크에 설명되어 있습니다.
http://trac.filezilla-project.org/ticket/3656
대충 해석해보면 broken server라는 단어가 등장하는데 이 서버는 SSL/TLS 폐쇄 경고를 보내지 않는다고 나옵니다. 그래서 서버를 업그레이드해야 한다고 하네요.
사실 파일질라 2.x 버전으로는 vsftpd 2.0.5 버전으로 구축된 ftps 서버(broken server)에 접속 가능합니다. 파일질라 구버전으로는 SSL/TLS closure alerts을 보내지 않는 보안상 취약한 broken server에 접속할 수 있습니다.
파일질라 최신 버전으로 와서는 이 SSL/TLS closure alerts를 보내지 않는 broken server를 감지할 경우 애당초 커넥션 자체를 맺지 않는 것입니다. 클라이언트에서 애초에 서버의 보안 취약점을 인지하고 접속 가능 여부를 결정하는 것이므로 ftps를 이용한다면 파일질라는 구버전보다는 최신버전을 이용하는 것이 당연히 현명한 선택입니다.
좀 더 자세한 보충 설명은 http://filezilla-project.org 의 인덱스 페이지에서 확인할 수 있었습니다.
If the data connection of a transfer gets closed, FileZilla did not check if the server performed an orderly TLS shutdown.
Impact
An attacker could send spoofed FIN packets to the client. Even though GnuTLS detects this with GNUTLS_E_UNEXPECTED_PACKET_LENGTH, FileZilla did not record a transfer failure in all cases.
Unfortunately not all servers perform an orderly SSL/TLS shutdown. Since this cannot be distinguished from an attack, FileZilla will not be able to download listings or files from such servers.
Affected versions
All versions prior to 3.1.0.1 are affected. This vulnerability has been fixed in 3.1.0.1
그렇다면 이 broken server 문제를 해결하려면 어떡해야 하느냐?
좀 더 정보를 찾아보니 아래 링크를 찾을 수 있었습니다.
vsftpd를 2.0.7 또는 그 이상으로 업그레이드하면 됩니다. 의외로 해결법은 간단하네요.
http://forum.filezilla-project.org/viewtopic.php?f=2&t=7688
2.0.7로 업그레이드하려면 우선 기존 버전의 vsftpd를 삭제하고 난 뒤 소스를 컴파일하여 설치하면 됩니다.
최신 버전은 http://vsftpd.beasts.org 에서 배포하고 있습니다.
오리지날 소스 그대로 컴파일해서 사용해도 ftp 서버 운영 상엔 큰 문제가 없지만 한글파일명이 로그에 ???로 출력되는 등의 문제가 생깁니다. 이유는 VsFTPD가 출력할 수 없다고 판단하는 ASCII Code 31 이하, 128~159, 177 문자를 모두 물음표(?)로 변경해서 처리하기 때문입니다. 압축을 푼 소스 디렉토리로 들어가서 아래와 같이 작업해 줍니다.
/* str_replace_unprintable(p_str, '?'); */ <- 이렇게 주석처리해 줍니다.
위와 같이 작업해도 ps 커맨드 상에서는 한글이 제대로 처리되지 않습니다. 하나 더 수정해야할 부분이 있습니다.
/* str_replace_unprintable(&proctitle_str, '?'); */ <- 이렇게 주석처리해 줍니다.
tcp_wrappers 와 ssl 연동을 위한 작업으로 아래와 같이 추가적으로 할 작업이 더 있습니다.
builddefs.h 를 편집기로 열어 아래와 같이 수정해 줍니다.
ifndef 를 define으로 변경해 주기만 하면 되는 간단한 작업입니다.
#ifndef VSF_BUILDDEFS_H
#define VSF_BUILDDEFS_H
#define VSF_BUILD_TCPWRAPPERS
#define VSF_BUILD_PAM
#define VSF_BUILD_SSL
#endif /* VSF_BUILDDEFS_H */
이제 컴파일 설치합니다.
make 도중 아래와 같은 에러가 나는 경우가 있습니다.
sysdeputil.c:162: error: expected declaration specifiers or '...' before 'header'
sysdeputil.c:162: error: expected declaration specifiers or '...' before 'data'
In file included from sysdeputil.c:170:
/usr/include/sys/sendfile.h: In function '_syscall2':
/usr/include/sys/sendfile.h:35: error: storage class specified for parameter 'sendfile'
sysdeputil.c:186: error: storage class specified for parameter 'environ'
sysdeputil.c:187: error: storage class specified for parameter 's_proctitle_space'
sysdeputil.c:187: error: parameter 's_proctitle_space' is initialized
sysdeputil.c:188: error: storage class specified for parameter 's_proctitle_inited'
sysdeputil.c:188: error: parameter 's_proctitle_inited' is initialized
sysdeputil.c:189: error: storage class specified for parameter 's_p_proctitle'
sysdeputil.c:189: error: parameter 's_p_proctitle' is initialized
sysdeputil.c:201: error: storage class specified for parameter 'do_sendfile'
sysdeputil.c:202: error: storage class specified for parameter 'vsf_sysutil_setproctitle_internal'
sysdeputil.c:203: error: storage class specified for parameter 's_proctitle_prefix_str'
sysdeputil.c:278: error: storage class specified for parameter 's_pamh'
sysdeputil.c:279: error: storage class specified for parameter 's_pword_str'
sysdeputil.c:281: error: storage class specified for parameter 'pam_conv_func'
sysdeputil.c:282: error: storage class specified for parameter 'vsf_auth_shutdown'
sysdeputil.c:288: error: expected '=', ',', ';', 'asm' or '__attribute__' before '{' token
sysdeputil.c:383: error: expected '=', ',', ';', 'asm' or '__attribute__' before '{' token
sysdeputil.c:398: error: expected '=', ',', ';', 'asm' or '__attribute__' before '{' token
sysdeputil.c:436: error: expected '=', ',', ';', 'asm' or '__attribute__' before '{' token
sysdeputil.c:474: error: storage class specified for parameter 'do_checkcap'
sysdeputil.c:478: error: expected '=', ',', ';', 'asm' or '__attribute__' before '{' token
sysdeputil.c:497: error: expected '=', ',', ';', 'asm' or '__attribute__' before '{' token
sysdeputil.c:514: error: expected '=', ',', ';', 'asm' or '__attribute__' before '{' token
sysdeputil.c:527: error: expected '=', ',', ';', 'asm' or '__attribute__' before '{' token
sysdeputil.c:604: error: expected '=', ',', ';', 'asm' or '__attribute__' before '{' token
sysdeputil.c:641: error: expected '=', ',', ';', 'asm' or '__attribute__' before '{' token
sysdeputil.c:796: error: expected '=', ',', ';', 'asm' or '__attribute__' before '{' token
sysdeputil.c:803: error: expected '=', ',', ';', 'asm' or '__attribute__' before '{' token
sysdeputil.c:809: error: expected '=', ',', ';', 'asm' or '__attribute__' before '{' token
sysdeputil.c:856: error: expected '=', ',', ';', 'asm' or '__attribute__' before '{' token
sysdeputil.c:889: error: expected '=', ',', ';', 'asm' or '__attribute__' before '{' token
sysdeputil.c:930: error: expected '=', ',', ';', 'asm' or '__attribute__' before '{' token
sysdeputil.c:935: error: expected '=', ',', ';', 'asm' or '__attribute__' before '{' token
sysdeputil.c:976: error: expected '=', ',', ';', 'asm' or '__attribute__' before '{' token
sysdeputil.c:1012: error: expected '=', ',', ';', 'asm' or '__attribute__' before '{' token
sysdeputil.c:1128: error: storage class specified for parameter 's_uwtmp_inserted'
sysdeputil.c:1129: error: storage class specified for parameter 's_utent'
sysdeputil.c:1134: error: expected '=', ',', ';', 'asm' or '__attribute__' before '{' token
sysdeputil.c:1173: error: expected '=', ',', ';', 'asm' or '__attribute__' before '{' token
sysdeputil.c:1189: error: old-style parameter declarations in prototyped function definition
sysdeputil.c:162: error: parameter name omitted
sysdeputil.c:162: error: parameter name omitted
sysdeputil.c:162: error: parameter name omitted
sysdeputil.c:1189: error: expected '{' at end of input
make: *** [sysdeputil.o] 오류 1
원인은 커널 2.6.18 버전부터 <linux/unistd.h>에서 syscall 매크로가 없어져서라고 합니다.
참고: http://www.bitshrine.org/gpp/vsftpd-2.0.5-syscall2.patch
sysdeputil.c 파일을 수정합니다.
부분을
#include <unistd.h>
로 바꿉니다.
_syscall2(int, capset, cap_user_header_t, header, const cap_user_data_t, data);
를 지우고 그 자리에
#define capset(head,data) syscall(__NR_capset,head,data)
를 넣습니다.
다시 컴파일해보면 아래와 같은 에러가 나는 경우가 있습니다.
collect2: ld returned 1 exit status
make: *** [vsftpd] 오류 1
libcap-devel 패키지를 설치하면 됩니다.
make install 까지 에러 없이 마쳤다면 PAM 관련 설정에 필요한 작업을 해줍니다.
# cp RedHat/vsftpd.pam /etc/pam.d/vsftpd
# cat /etc/pam.d/vsftpd
auth required /lib/security/pam_listfile.so item=user sense=deny file=/etc/ftpusers onerr=succeed
auth required /lib/security/pam_pwdb.so shadow nullok
auth required /lib/security/pam_shells.so
account required /lib/security/pam_pwdb.so
session required /lib/security/pam_pwdb.so
/etc/pam.d/vsftpd 파일은 /etc/ftpusers에 등록된 유저명은 접근을 하지 못하게 하는 것입니다(sense=deny).
ftpusers 파일이 없다면 생성해 주면 됩니다(/etc/passwd 파일을 참조해 작성).
bin
daemon
adm
lp
sync
shutdown
halt
news
uucp
operator
games
nobody
smmsp
xfs
gdm
mysql
PAM 관련 설정과 관련된 아래 옵션이 vsftpd.conf 파일에 반드시 추가되어 있어야 하는 점 유의하세요.
소스로 설치하면 /etc/rc.d/init.d 디렉토리 안의 실행 스크립트 파일이 존재하지 않으므로 수동으로 생성해 주어야 합니다. 소스 설치 전 rpm 버전의 vsfptd를 삭제하기 전에 스크립트 파일과 vsfptd.conf 파일을 백업해 두고 소스 설치 후 그대로 재활용하는 것도 한 방법입니다.
저는 standalone으로 구동하지 않고 xinetd 방식으로 vsftpd를 구동하기 때문에 스크립트 파일이 따로 필요치 않았습니다.
standalone 모드로 구동하려면 vsftpd.conf 파일에 아래 내용이 있어야 하며
아래와 같이 바이너리를 실행해 줍니다.
데몬을 끌 때는 killall 커맨드를 이용합니다.
xinetd 모드로 구동하려면 vsftpd.conf 파일에 아래 내용이 있어야 하며,
/etc/xinetd.d/vsftpd 파일을 생성하여 아래와 같이 내용 작성하고,
{
socket_type = stream
wait = no
user = root
server = /usr/local/sbin/vsftpd
nice = 10
disable = no
}
xinetd 를 restart하면 됩니다.

